
Getting Started
Login To MeetingResult
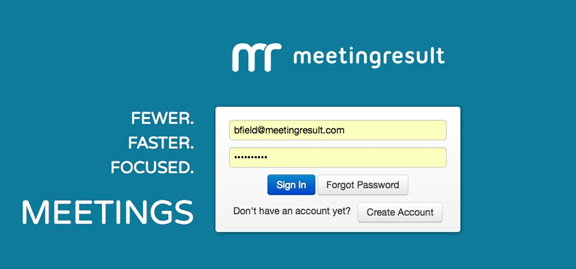
Step 1 - Open your browser and navigate to http://cloud.meetingresult.com
Step 2 - Enter your username (email) and password and click Login.
Create Stakeholders
Stakeholders are individuals that you will either invite to meetings or inform about meeting outcomes. There are three options for creating Stakeholders. You can add them one-by-one, you can bulk upload a list of Stakeholders or you can create them automatically when you schedule a meeting in your calendar system (Outlook, Google Calendar, Lotus Notes, etc.). To get started we will show you how to use the one-by-one option. The other two options are covered in our MeetingResult Essentials User Guide.
At a minimum you will need to create a Stakeholder account for yourself and one other person. However you can create as many as you would like. You can continue to add more Stakeholders over time as required.
To create Stakeholders one-by-one follow the steps below.
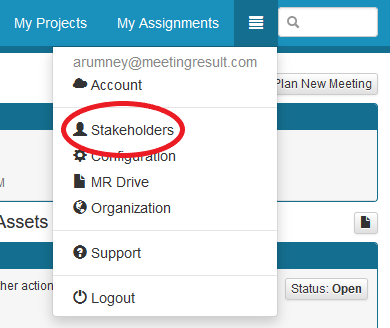
First, click on the menu bar link in the upper right hand corner of the screen next to the global search box and choose Stakeholders from the drop down list.
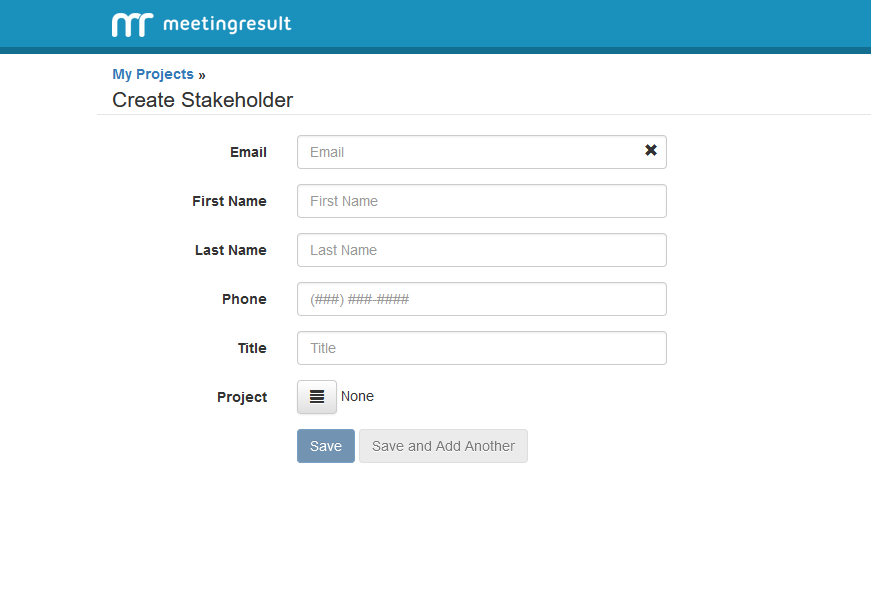
Click on the "Create" button.

Complete the information for the Stakeholder in the form displayed below. At a minimum you need to supply First Name, Last Name and Email. If you would like to create more Stakeholders click Save and Add Another. Otherwise click Save.
Create a Project
All Meetings in MeetingResult occur within a Project. The Project is simply a container. If you conduct Meetings in a different context then just use the name of that context for the Project name. Some additional contexts we see are proposals, sales opportunities, clients, etc. To create a new Project follow the steps below:
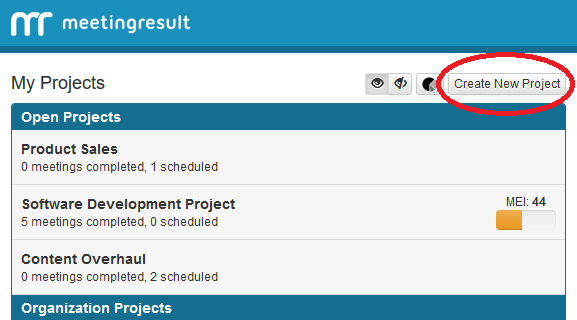
Step 1 - Click on the Create New Project next to the My Projects header on the main dashboard of the application.
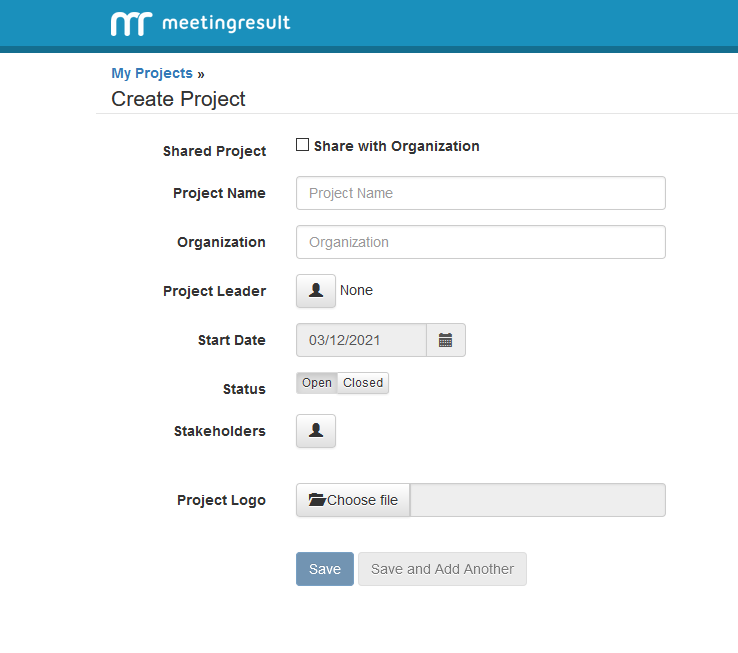
Step 2 - Complete the fields in the form below. If you would like to create another Project click Save and Add Another. Otherwise click Save.
Note: Only Project Name. Start Date and Status are required. All other fields are optional. The Start Date of the Project will default to the current date and Status will default to Open.
Plan Your First Meeting
There are three options for planning meetings using MeetingResult. The first two options involve initiating the planning process from within MeetingResult and the third option involves initiating the planning process from your existing calendar software program (e.g. Outlook, Google Calendar, Lotus Notes, etc.) In this section we will cover the two options available within MeetingResult. The third option is addressed in our MeetingResult Essentials User Guide.
Step 1 – Enter Logistical Information
You can create a Meeting from either the My Projects Dashboard or from within an individual Project. To plan a new meeting from the main dashboard you will click on the Plan New Meeting button in the upper right hand corner of the main system dashboard (i.e. My Projects Dashboard).

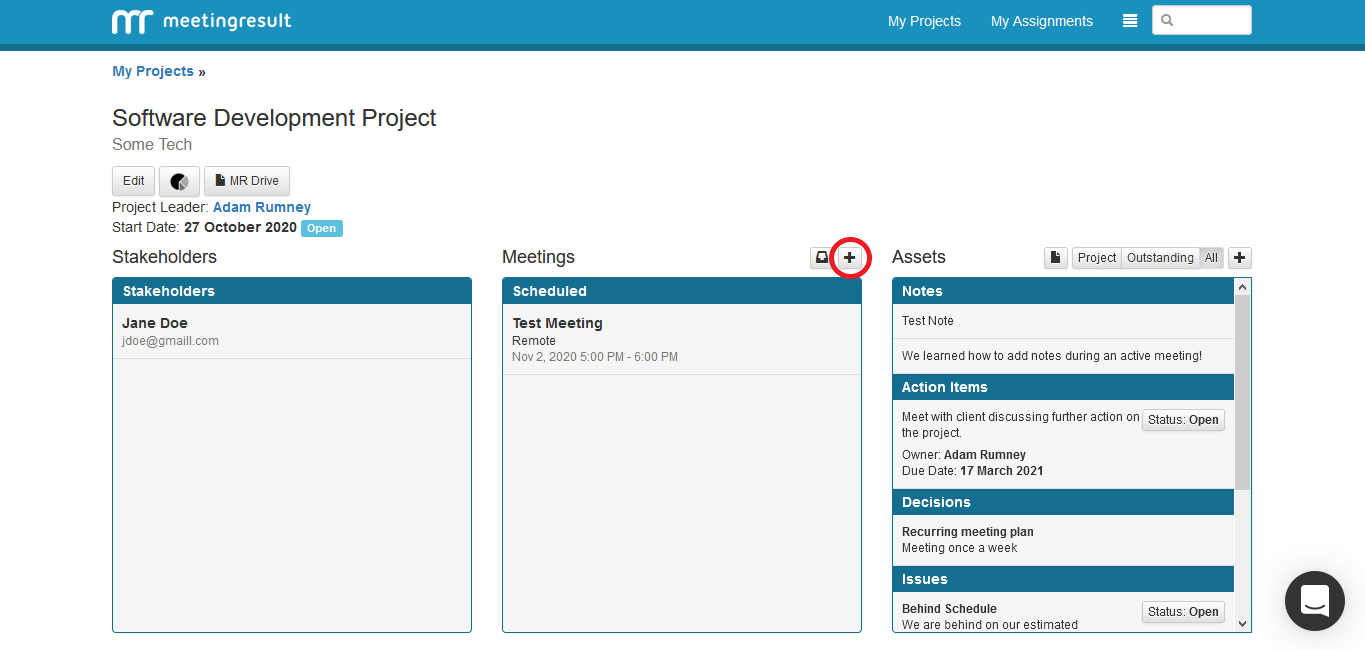
To plan a new meeting from within an individual project dashboard you will click on the plus sign next the Meetings section header.
The first screen, shown below, allows you to capture the Meeting Name, Location, Project Name, Date/Time and the Duration of the Meeting. Click "Create" to go to the next step.

Step 2 – Add Objectives, Agenda Items and Attendees
In the second step of the Meeting Planning process you will define your Objective(s), Agenda Items, and select Attendees and Subscribers for the Meeting. As a reminder ‘Subscribers’ are a category of Stakeholders who will not attend the Meeting but will receive a copy of the Meeting Summary Report generated after the Meeting is completed. Instructions for creating Objectives and Agenda Items and selecting Attendees and Subscribers are presented next.
Plan Meeting - Add Objectives
To add Objectives follow these steps:
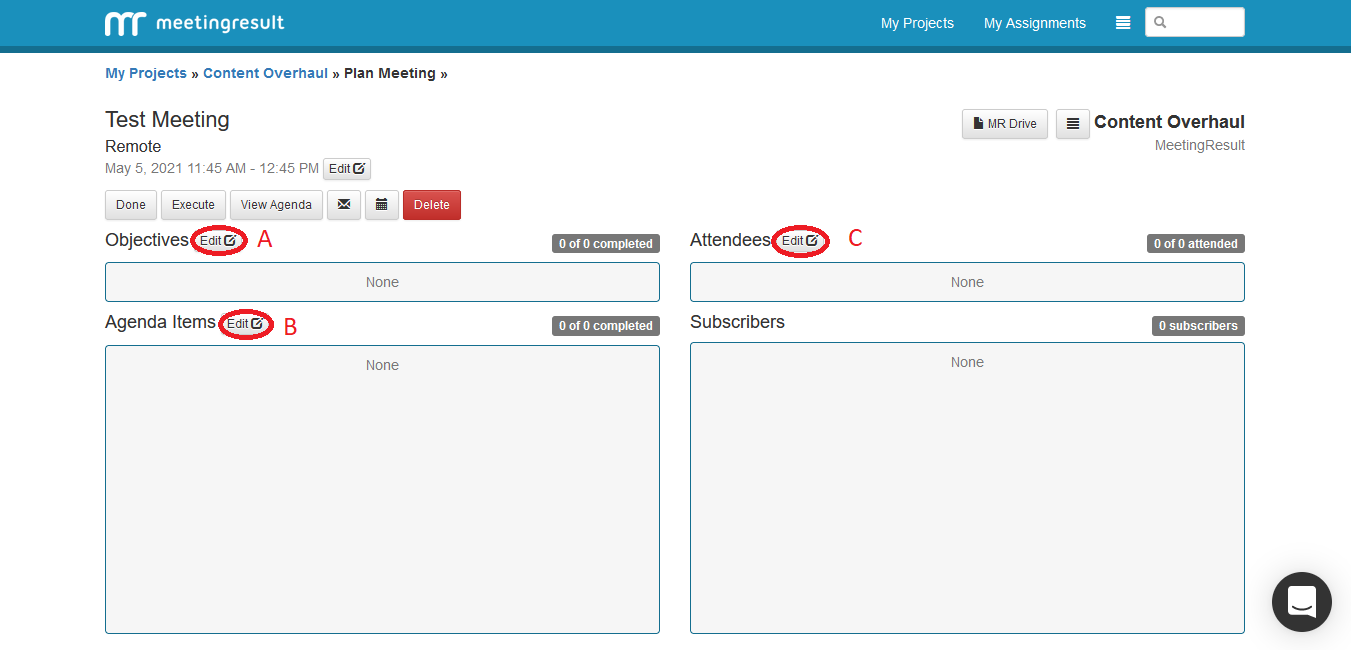
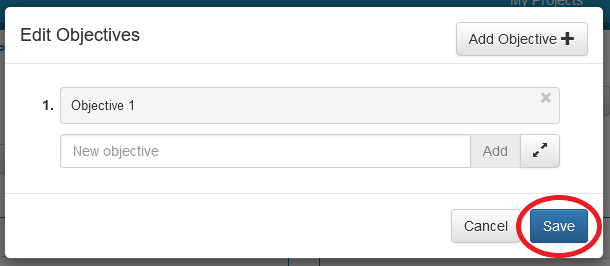
Step 1 - Click on the Edit button to the right of the Objectives label. It is denoted as "A" in the screenshot above.
Step 2 - When you click on the Edit button you will see the screen below. You can either use the Quick Add feature by entering the text of your Objective and clicking the ‘Add’ button. Alternatively you can click on the "Add Objective" button in the upper right hand corner or the expand arrow icon to the right of the ‘Add’ button to open up the Objective editor if your Objective requires more than one line of text to enter.

Step 3 – If you decide to open the full Objective editor screen then type the Objective in the text box provided. When you are finished click the "Back to Objectives List" in the bottom left corner of the pop-up window.
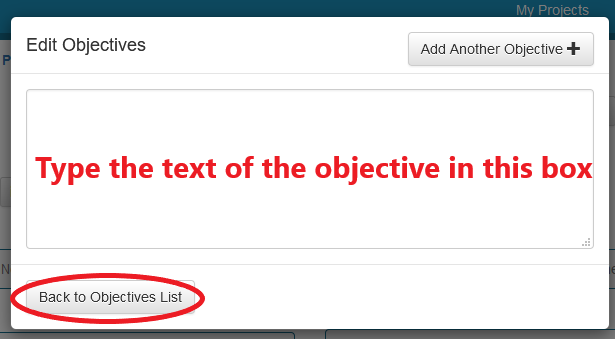
Step 4 - To create additional Objective Items follow the same steps. When you are finished creating Objectives click on the ‘Save’ button in the bottom right hand corner of the pop-up window.
Plan Meeting - Add Agenda Items
To add Agenda Items follow these steps:
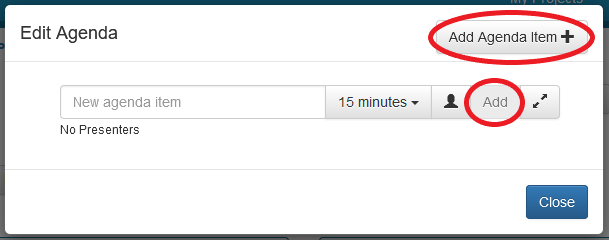
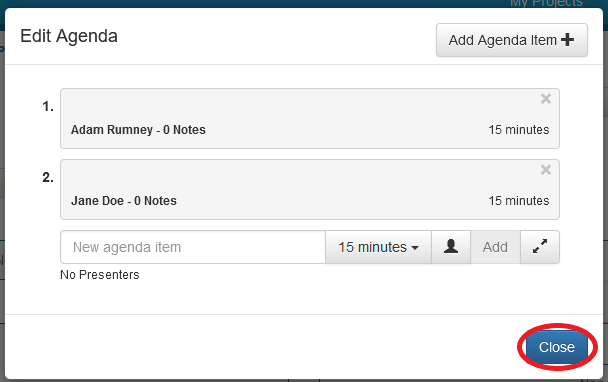
Step 1 - Click on the Edit button to the right of the Agenda Items label. It is denoted as "B" in the screenshot at the beginning of the Meeting Planning section.
Step 2 - When you click on the Edit button you will see the screen below. You can use the Quick Add feature by entering the text of your Agenda Item, choosing the time allocated to the Agenda Item from the drop down time selection control, selecting the presenter(s) by clicking on the person icon and clicking the ‘Add’ button. Alternatively you can click on the "Add Agenda Item" button in the upper right hand corner of the popup to open up the full Agenda Item editor if your Agenda Item description requires more space than provided on the Quick Add view.
Step 3 – If you decide to open the full Agenda Item editor screen then type the Agenda Item description in the text box provided, click on the time selection drop down and choose the amount of time allocated to the Agenda Item and click on the Person icon to choose the presenter(s) for the Agenda Item. A popup window will appear and you can type in the name of the presenter to immediately locate them in the list or scroll and click on the name(s) of the presenter(s).
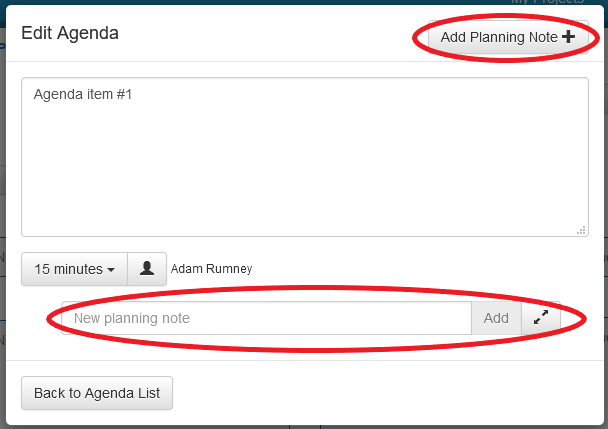
Step 4 – Next you can optionally create planning notes for the Agenda Item. Planning notes are important details that you, the Meeting leader, want to remember when a particular Agenda Item is covered.
Note: The planning notes will not show up on the Agenda that you will distribute. If you want to create planning notes for an Agenda Item you have to open the full Agenda Item editor because this feature is not available using the “Quick Add” feature for Agenda Items.
Plan Meeting - Add Planning Notes For An Agenda Item
To create Planning Notes for an Agenda Item follow these steps:
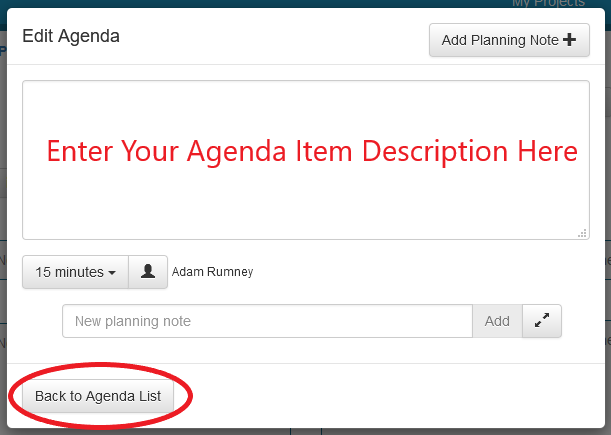
Step 1 - Click on the "Add Planning Note" button in the upper right hand corner of the Add Agenda Item popup window or use the “Quick Add” feature for planning notes.
Step 2 - Enter the text of your Planning Note.
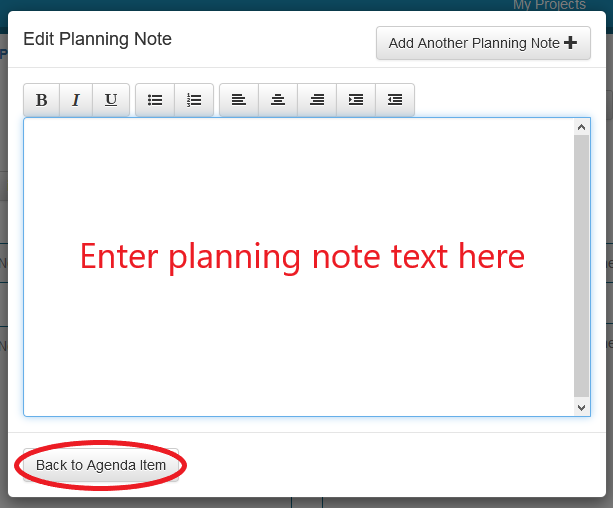
Step 3 – To create additional planning notes repeat steps 1 & 2.
Step 4 - When you are finished creating planning notes click the "Back to Agenda Item" button located in the bottom left hand corner of the Edit Planning Note popup window.
To create additional Agenda Items follow the same steps. When you are finished adding Agenda Items click the blue ‘Close’ bottom in the bottom right hand corner of the Edit Agenda popup window.
Plan Meeting - Add Attendees and Subscribers
To add Attendees and Subscribers to your Meeting follow the steps below. If you have already planned your Agenda you will notice that your Agenda Item presenters have already been added to the attendee list.
Step 1 - Click on the "Edit" button to the right of the Attendees label. This is denoted as "C" in the screenshot above.
Step 2 – You will be presented with a popup window that contains your list of Stakeholders. Stakeholders for the associated Project are displayed at the top, and your full Stakeholder list is displayed next. You can either scroll through the list to select Attendees and Subscribers or you can type the name in the search box at the top to jump directly to the Stakeholder you would like to add as an Attendee or Subscriber.
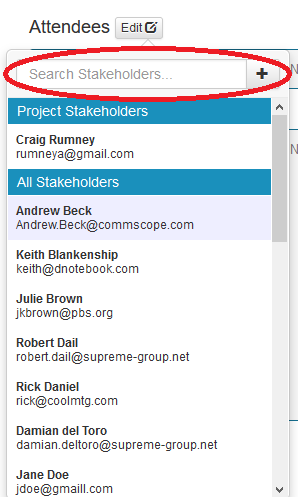
Step 3 - To select a Stakeholder as an Attendee click on their name once. You will see a green "attendee" label appear to the right of their name. To select a Stakeholder as a Subscriber click on their name twice and you will see a blue "subscriber" label to the right of their name.
Step 4 - Repeat this process for all the Attendees and Subscribers for your Meeting.
Step 5 - When you are finished selecting Attendees and Subscribers for your Meeting click on the Edit button or somewhere off of the Attendee popup window to close the popup window.
Plan Meeting - Review and Save
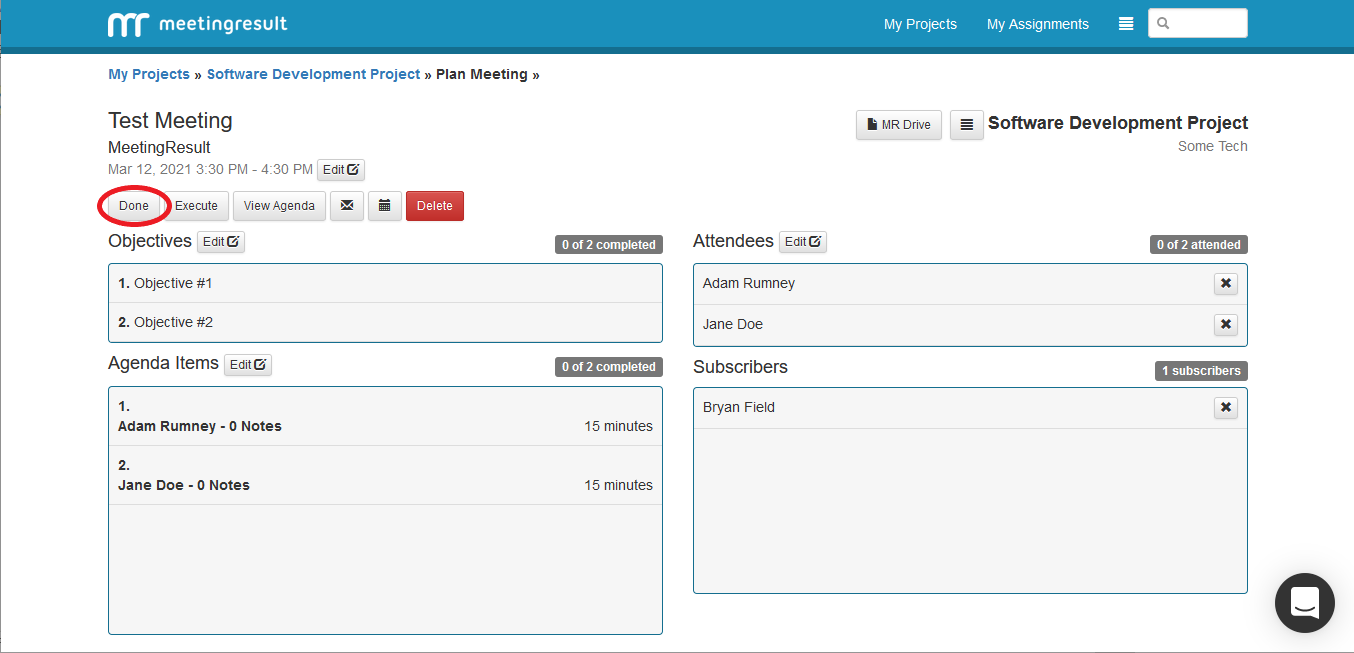
When you have added your Objectives, Agenda Items, Attendees and Subscribers the Meeting Planning process is complete. Click on the "Done" button, highlighted below with a red circle, to save your Meeting. If you need to make changes you can reopen by clicking on it in the Upcoming Meetings section of the My Projects Dashboard or the individual Project Dashboard.
Post Meeting Planning Activities
At the conclusion of the planning phase there are a number of tasks that you will want to complete to ensure that you communicate expectations for the meeting and make sure that everyone comes prepared. Once the meeting has been planned you will see the view below. From this screen you can perform the following actions. Details on performing these are included in our MeetingResult Essentials User Guide.
Edit Meeting Planning Details
A - Execute the Meeting
B - Download the Agenda (Word or PDF format)
C - Distribute the Meeting Agenda and Calendar Invite
D - Download the Calendar Invite

Comments